Shopify Sales Channel
Falabella/Linio is available as a Shopify Sales Channel. Through this integration, you can join our marketplace in Chile, Colombia, Mexico, and Peru no matter where you are in the world. It is really easy to manage your whole product catalog and fulfill orders, and all of that without leaving your Shopify store.
With Shopify and the Falabella/Linio Sales Channel, you can:
- Manage your catalog: The App will push all your enabled products into our marketplace, by creating or updating them in Seller Center. You can set your product's attributes individually or massively by importing them into a CSV.
- Order processing: The orders created at our marketplace will be automatically reflected in Shopify. You can process orders using preselected shipment providers and get print-ready documents inside Shopify, or use your own shipment provider.
- Stock synchronized automatically: The App is designed to have a synchronous real-time connection between both systems in order to update stock on both sides each time a user updates it's stock manually or when order is created.
IMPORTANTIf you are interested in using this app, please let us know by following the instructions in contact. We are always happy to help you.
Note: To use this App, you need to own an account in Seller Center, this happens once you become a valid seller. Needing an account?
Versions
| Plugin Version | Status | Compatibility |
|---|---|---|
| 1.0 | Released | Shopify and Shopify Plus |
Index
- Installation
- Configuration
- Usage
- Single product creation
- Bulk product creation
- Activate products in sales channel
- Validate products in Seller Center
- Update products
- Manage orders
Installation
-
Log in to your Shopify account.
-
Go to "Apps" on the menu, and visit the Shopify App Store.
-
Search for "Falabella.com & Linio" and click on "Add app".
-
Accept the installation of the Sales Channel.
Configuration
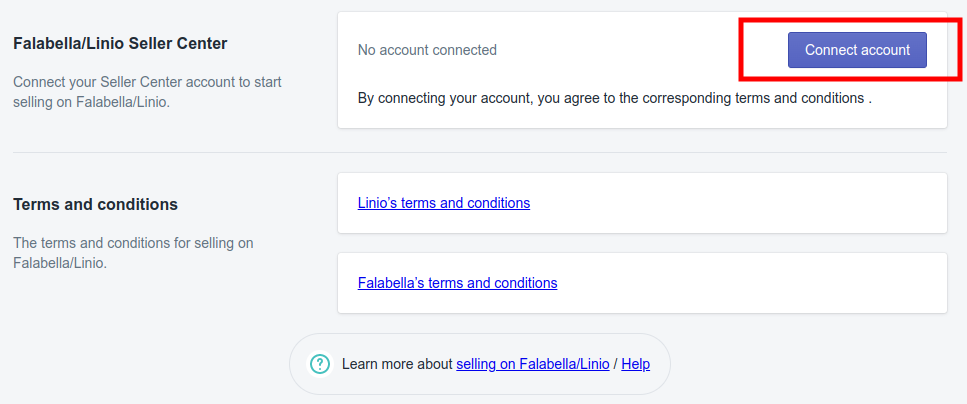
- Go to Falabella/Linio Sales Channel > Account > Connect Account
- Open a new tab in your browser and log into your Seller Center account:
| Country | URL |
|---|---|
| Colombia | https://sellercenter.linio.com.co |
| Mexico | https://sellercenter.linio.com.mx |
| Peru | https://sellercenter.linio.com.pe |
| Falabella (Global) | https://sellercenter.falabella.com |
- Go to Settings > Manage users.

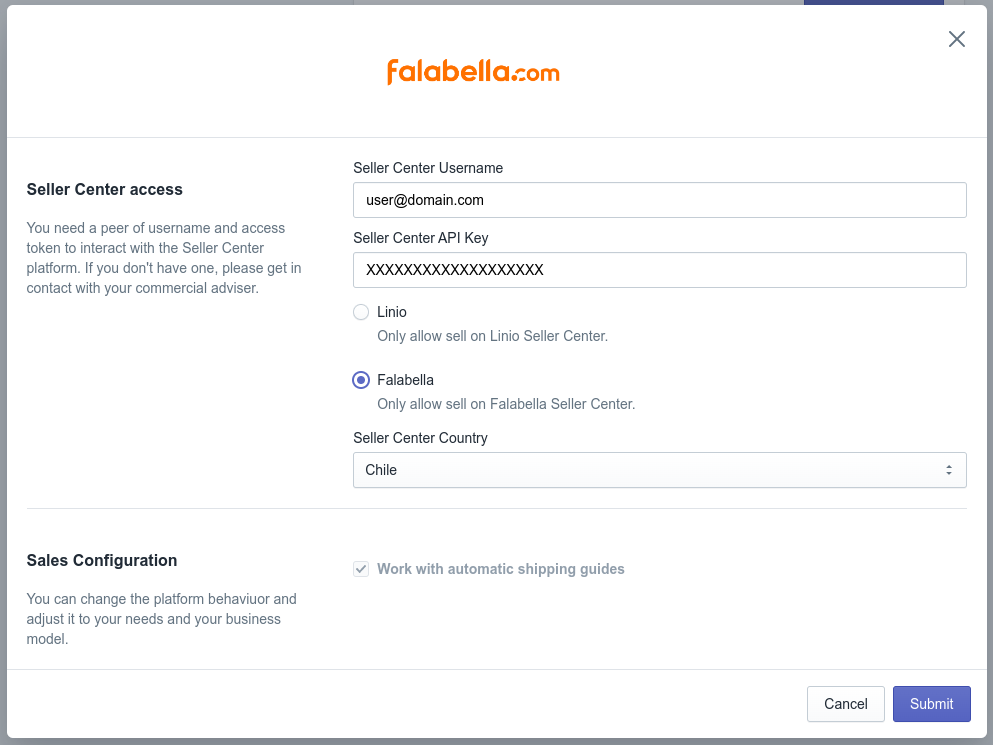
- Copy your "EMAIL" and your "API KEY".

-
Return to Shopify and paste it into the popup in order to have both credentials configured.
-
Select your country (it must be the same of your Seller Center's account).
-
If you are selling in Linio, please enable automatic shipping guides. See updating order status for more info.
Usage
Our Sales Channel is divided into three views:
- Account: This view allows you to see the values you set during the configuration.

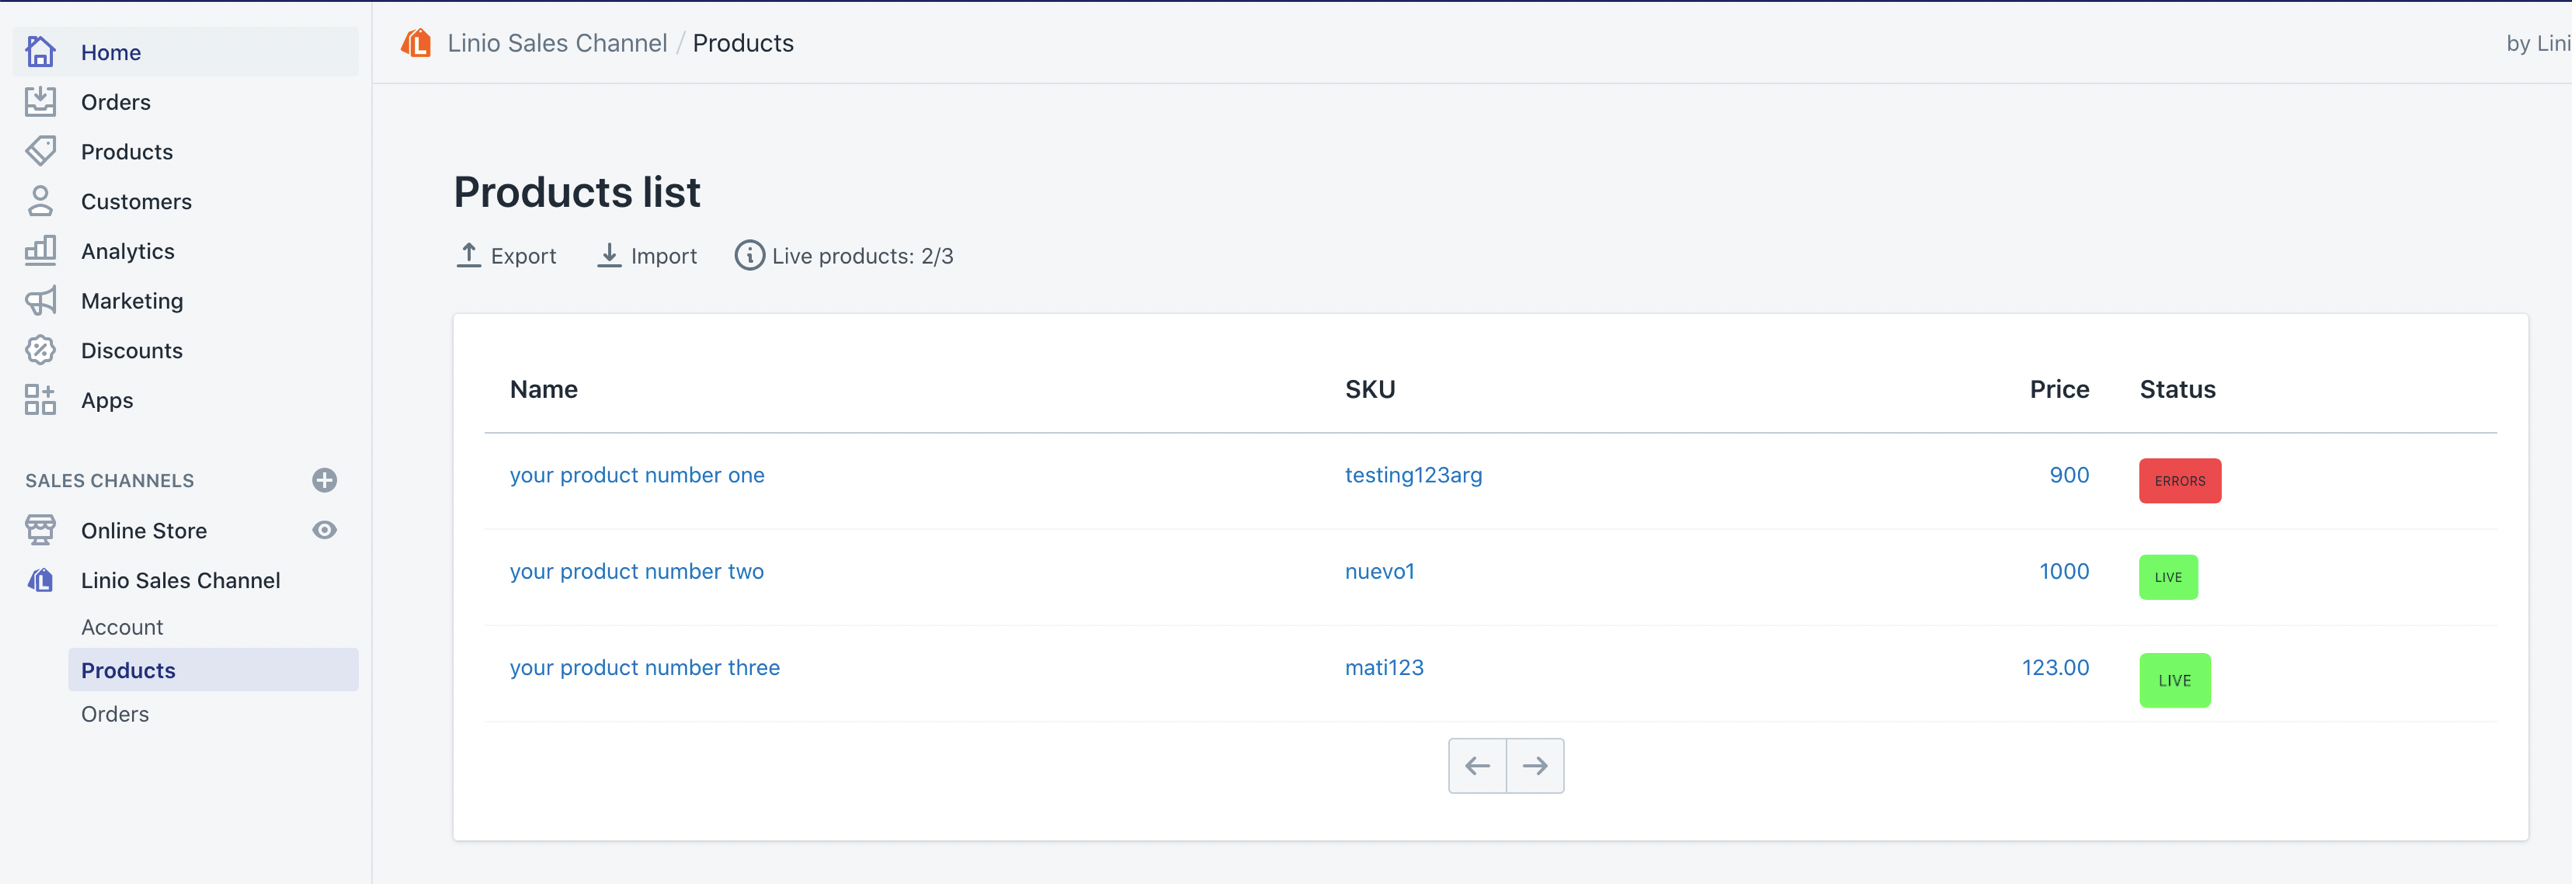
- Products: This view allows you to select and complete the information required at Falabella/Linio to sell your products.
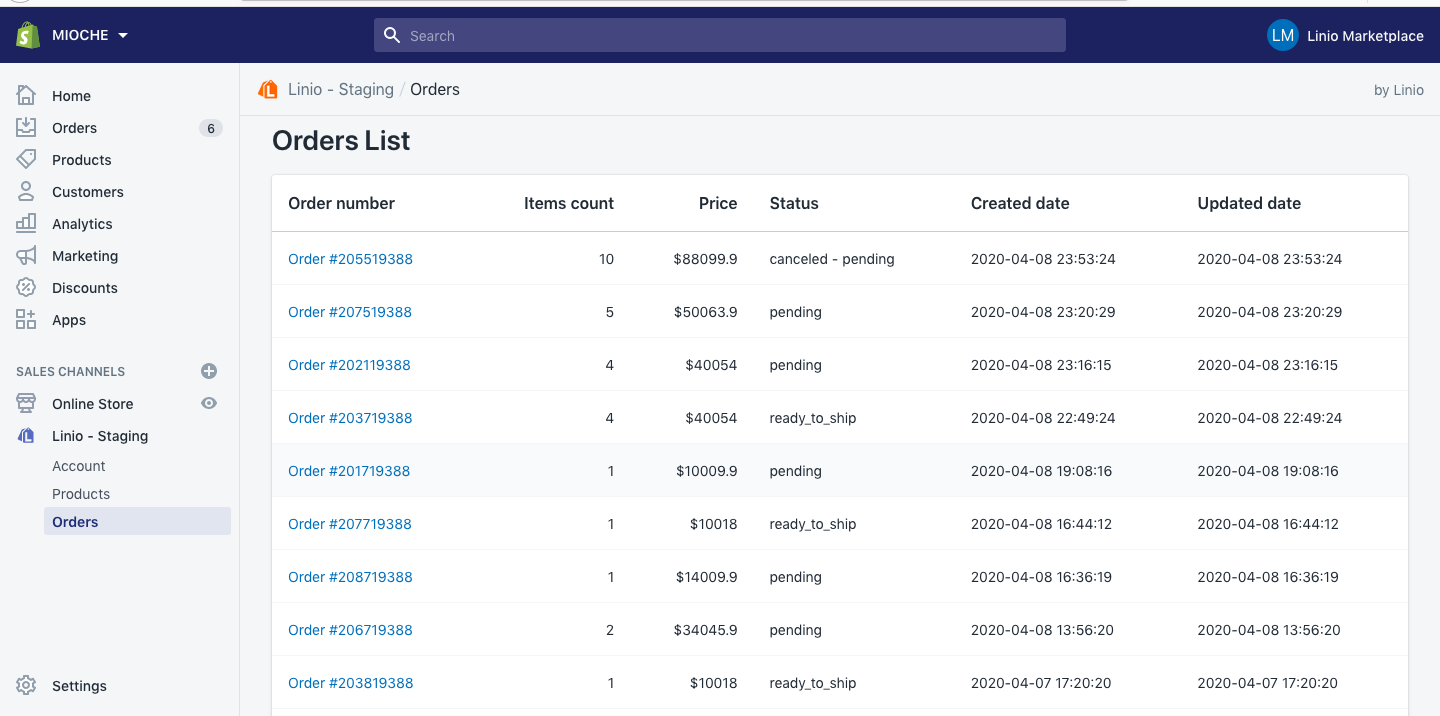
- Orders: This view allows you to check the status of your orders and to print the order documents as well .
Single Product Creation
IMPORTANTIn order to sync products from Shopify into your Seller Center account, it is required to create your products at Shopify first.
The app can't work with products that you have created on Seller Center prior to the integration. In that case, you should remove your original product in Seller Center and create it in your Shopify store.
In this section it is described how to sync one product at a time.
-
On the right panel, select Falabella/Linio Sales Channel > "Products" on the menu.
-
Select the product that you want to sell with us.
-
Fill all required fields.
3.1. Fill in the short description with at least 3 bullets.
3.2. Fill in the warranty related to the product.
3.3. If the product name is too short, you must update it using at least 20 characters. We would really appreciate you make use of the following (recommended) format:
Product + Brand + Model + Technical specs + Hyphen (-) + Color
E.g. Runner Shoes Generic Model 1 low weight, military-grade cover and fashionables - Black3.4. Indicate the price for Falabella/Linio Marketplace in local currency according to the country you selected when you connected your account. Please be aware that your price should contain: Your cost + financial gains + Falabella/Linio commission + Taxes.
3.5. Fill in the package dimensions (it is required to have the exact values or at least the most accurate information).
3.6. Select a Valid Brand. In case you want to sell products with an unregistered brand, it is required to request the brand creation in Falabella/Linio. For more information follow this link. In case you are selling unbranded products you should use Generic brands.
Please note that the use of some copyrighted brands is restricted. Also, if you are selling Apple or Xiaomi products, let us know beforehand. In any of these cases, you should ask your KAM. More info about brands here.3.7. Select the product's main category.
3.8. Fill in the variation(s).
3.9. Fill any other required and/or desired field.
-
Once all the required fields have been filled, the “Save” button will be enabled and the product should be created in Seller Center after a few minutes.
Seller Center approvalIf your product contains good-quality content, the product will be automatically activated at Seller Center after a few minutes. As it will be sold in Latin America, we recommend to write your product content in Spanish.
Bulk product creation
Performing a massive upload is as simple as performing three easy steps: Export your Products at Sales Channel, fill the template with your information, and Import it.
-
Go to the Sales Channel and select "Products" on the left panel.
-
Click on the Export button.
2.1. Select the Category where your products will be published at Marketplace
2.2. You can either select the Collection of products that you want to export (learn more about Shopify collections here), or you can select the checkbox at the bottom to export all products no matter which collection they belong to.
2.3. If you have any doubts about how to fill any field, you can export a description of all attributes with their type and valid options, by clicking Export template references.
-
Close the export pop-up.
-
Fill in the fields in the template file.
- Take into account while completing the file:
The PackageWeight field (retrieved from each Shopify Product) is only for reference.
Important:- The measured value must be expressed in Kilograms (kg)
- It must be as close as possible to the actual package weight
-
Click the Import button.
-
Choose the completed template file and click Import.
-
Check the products content was successfully updated.
Errors importing fileIn case of an error, the system will display the message Your upload was unsuccessful, the error report will be downloaded automatically. and a report file will be downloaded with useful info to correct your import file.
Activate products in sales channel
To see Shopify products in the app, it is necessary to enable them from the Shopify catalog to be available in the product list of the app.
-
The first step is to verify which products in your Shopify catalog (if any) are available to be shown in the product list of the Falabella/Linio app. To do this, you can use Shopify product filters (learn more about them here).
-
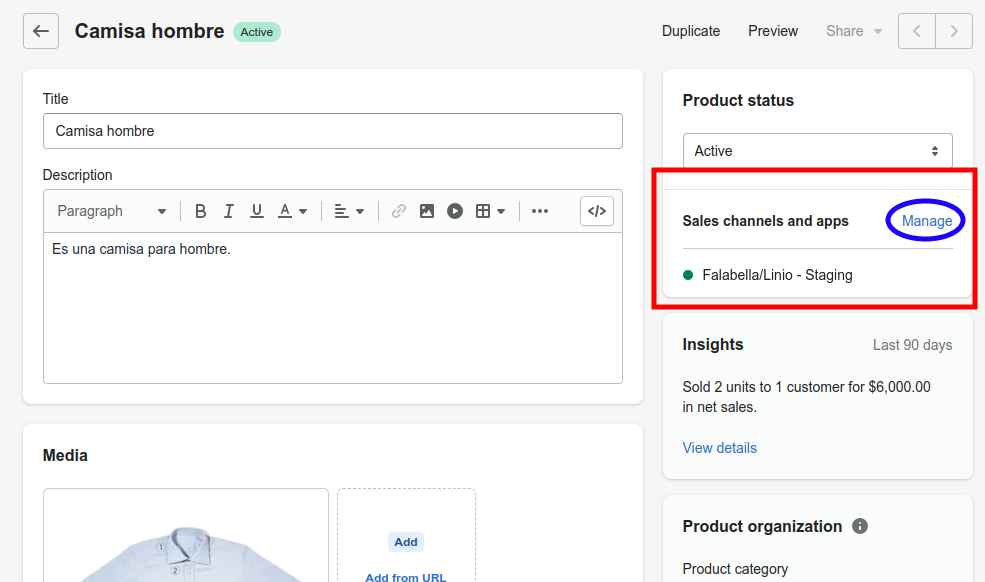
In case you need to enable some product(s), click the product you want to edit. Inside the editor, go to the section Sales channels and apps and click Manage.
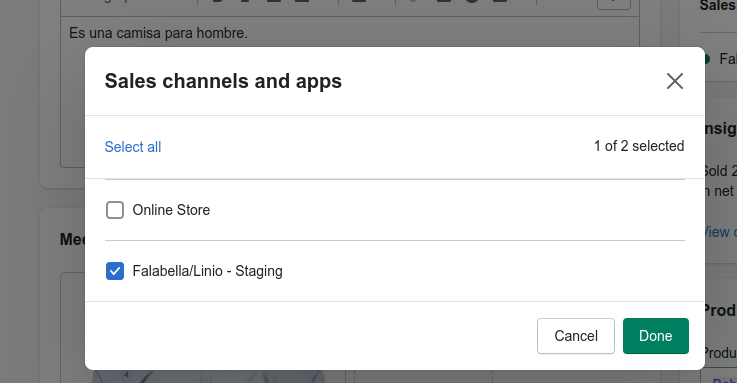
- Verify that Falabella/Linio Sales Channel is checked.
Validate products in Seller Center
To validate Products were synced to Seller Center:
-
Go to your Seller Center account. Go to Products > Manage Products, where you should see your product created.
-
To validate if the images were uploaded, place the mouse over the product name.
-
We recommend an additional validation going to the feeds view. Go to Products > Import Products > Monitor Import Result. There you can monitor any eventual errors in products creation and update.
ImportantThe product validation depends on several different factors. One of them is the Quality Control, which is an automatic validation at Falabella/Linio. It decides automatically if the product should be approved or rejected, based on its content. You can learn more about how products are approved here.
Update products
Once the products were created at Shopify and synced with Seller Center, they can be updated anytime from the app.
Content and price updates:
You can update the content and price from the Sales Channel product page. The system will validate whether the product was created before or not.
-
Edit all the fields to be updated.
-
Click on the Save button.
Already existing products in Seller CenterAs mentioned before, if a product was created directly in Seller Center and it is still active, you should delete that product at Seller Center and create it again in Shopify, in order to manage it from the app.
Update many productsYou can also do a bulk product update repeating steps on Bulk product creation.
Stock Update:
-
Go to the Shopify's products menu, outside the App.
-
Select the product to be updated.
-
Edit the stock for the selected product.
-
Save the product.
Manage orders
View orders and documents
You can view a list of synchronized orders by going to the Orders tab in the Sales channel.

By clicking any of the orders, you can see its details and print the documents associated with it:
• Invoice: It is the receipt from Falabella/Linio. Attach it to the package to be discovered by the customer once the package is delivered.
• Shipping Parcel: This is the PDF generated by Seller Center. Print and paste it on the package in order to send the product to the customer.
Mark order as "ready to ship"
In Falabella, shipping guides are always generated automatically by using our carriers. On the other side, in Linio you have the option of using your own carriers, which modifies the order processing flow.
Scenario 1: Using Falabella/Linio carriers
If you chose work with automatic shipping guides generated by the marketplace when you configured the app, you have to follow the following steps:
If you are integrated with Linio and you want to use automatic shipping guides, please validate you seller configuration with your KAM in order to do so.
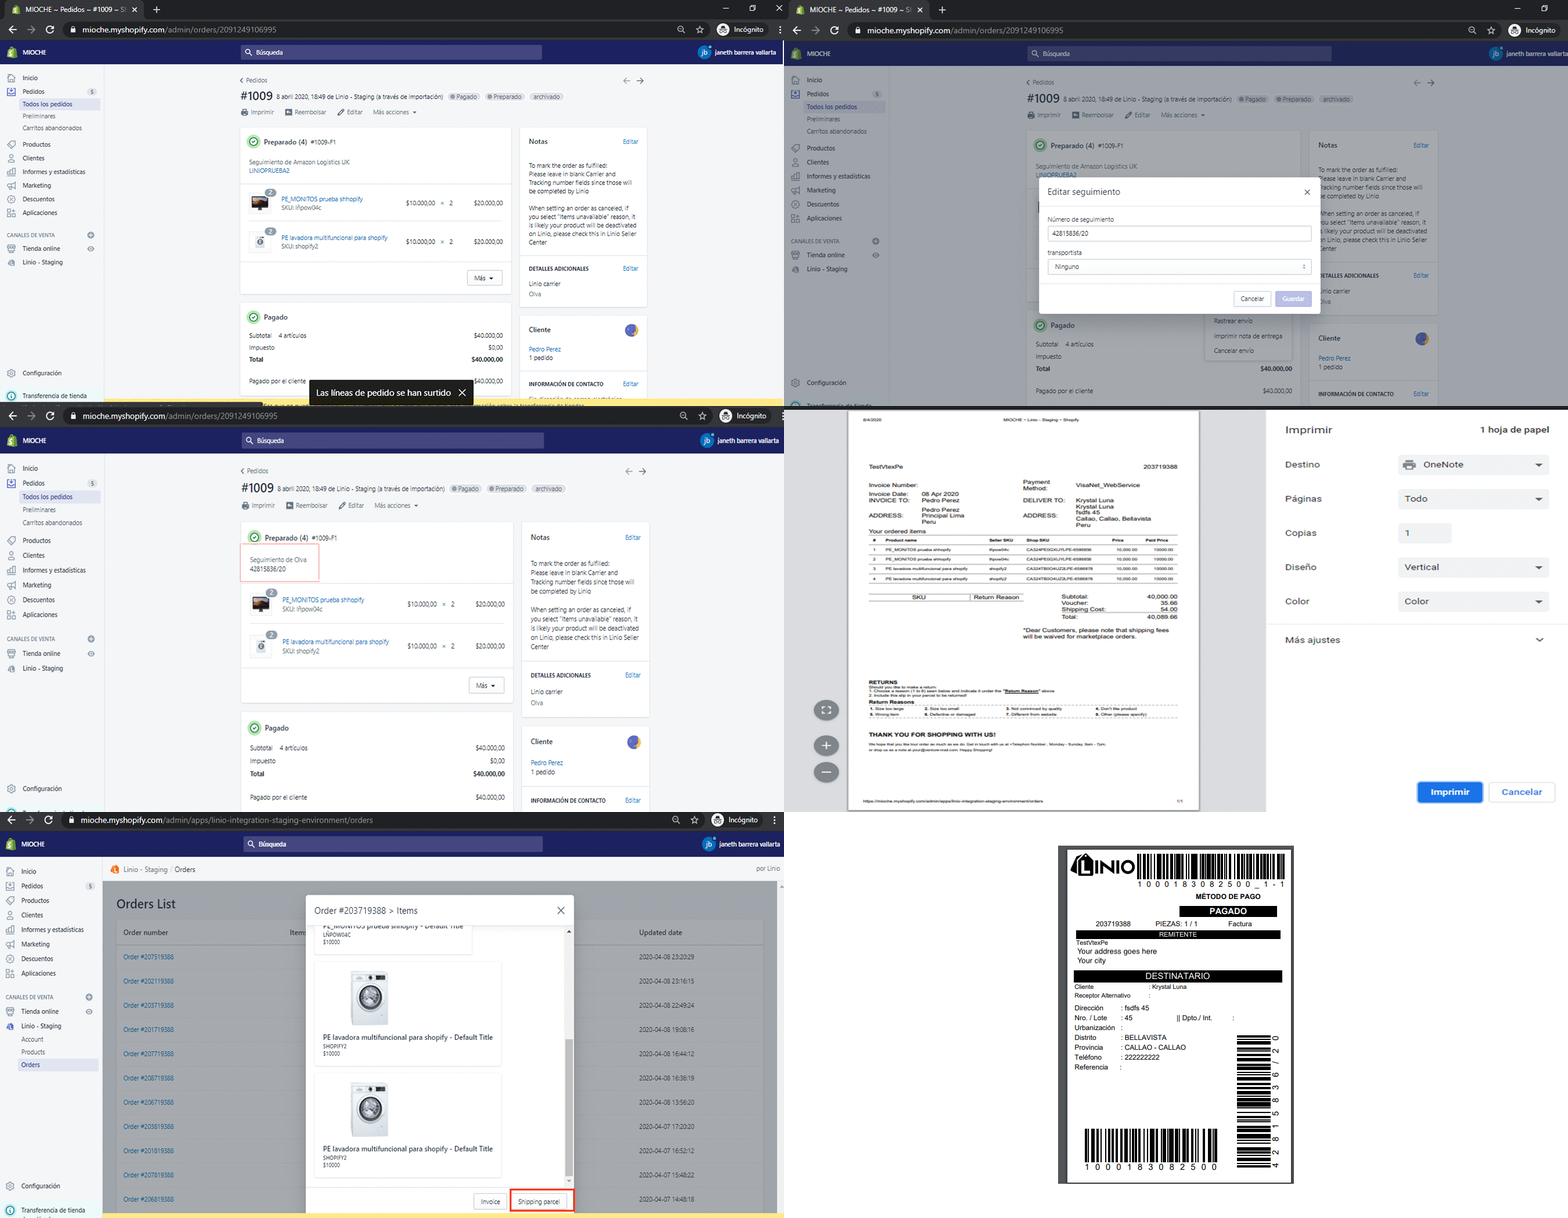
- Whenever a new order is received at your Seller Center account, if the SKU sold at Falabella/Linio also exists in Shopify, the order will be sent to your Shopify store.
You will be able to find the order in your Shopify orders list, outside the app. You can relate it to the Seller Center order by the order ID attached as a tag.

-
If you click an unfulfilled order, inside the order details on the right, you will find instructions to fulfill the order.
-
Mark your order as fulfilled.
-
Just as the instructions said, leave empty the shipping number and carrier, and click on the button Fulfill items.
If everything worked well, you will see that the order status in Seller Center is now "ready to ship". The following statuses ("Shipped" and "Delivered") are managed by Seller Center.
Scenario 2: Using your own carriers (only for Linio)
If you are integrated with Linio and did not choose work with automatic shipping guides generated by the marketplace when you configured the app, you have to follow the following steps:
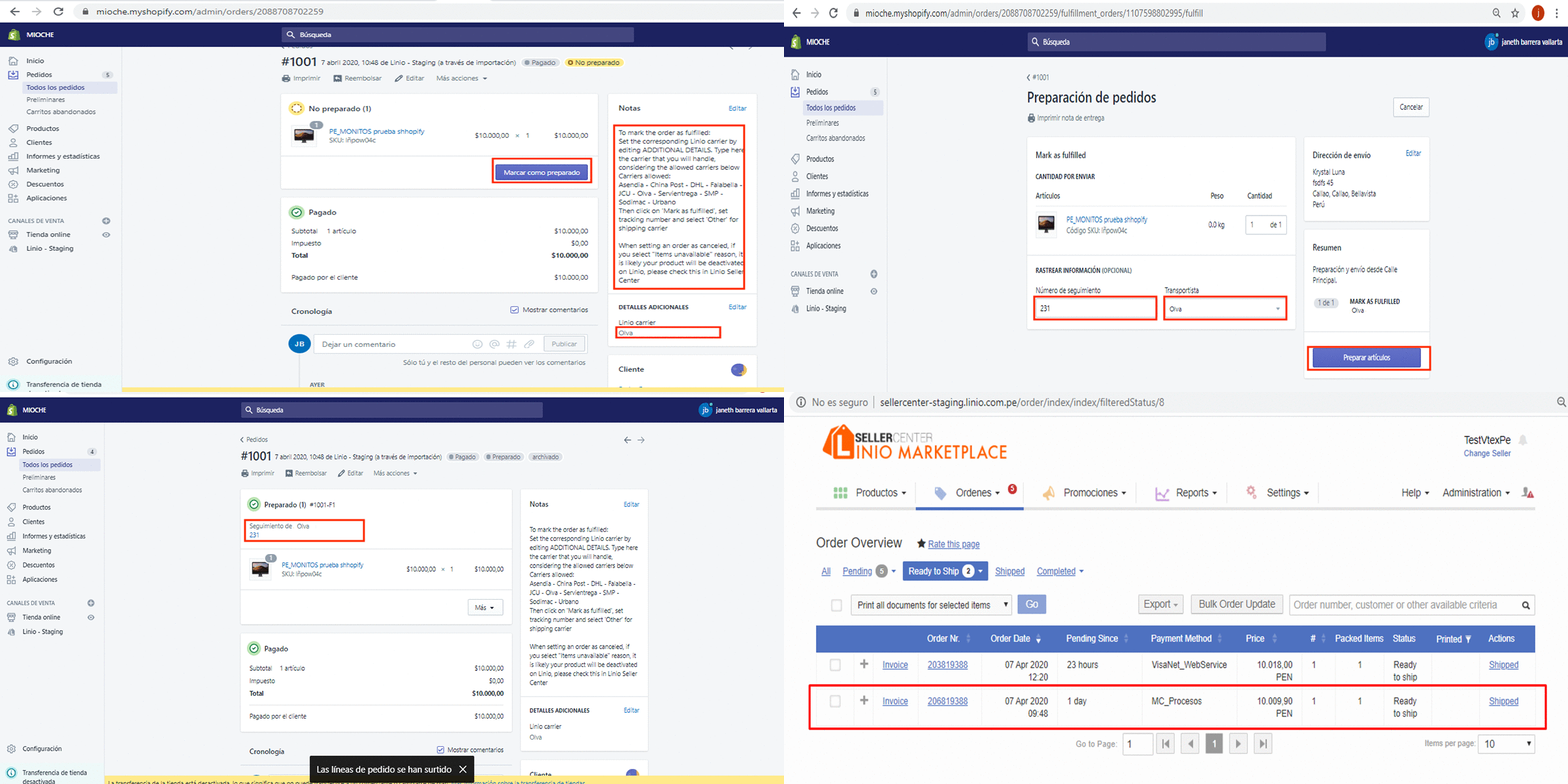
The steps are the same as in scenario 1, with the difference of setting the shipping number and carrier before marking the order as fulfilled.
-
Find your order, just as in scenario 1.
-
If you click an unfulfilled order, inside the order details on the right, you will find all the carriers you have registered in your Seller Center account.
-
Mark your order as fulfilled.
-
Fill the shipping number and carrier: You must use one of the carriers seen in step 2 because, even if you want to use your own shipment agreement, you must use a valid shipment provider available at Linio. You cannot feed a carrier not valid for Linio.
-
Click on the button Fulfill items.
If everything worked well, you will see that the order status in Seller Center is now "ready to ship". The following statuses ("Shipped" and "Delivered") are managed by Seller Center.
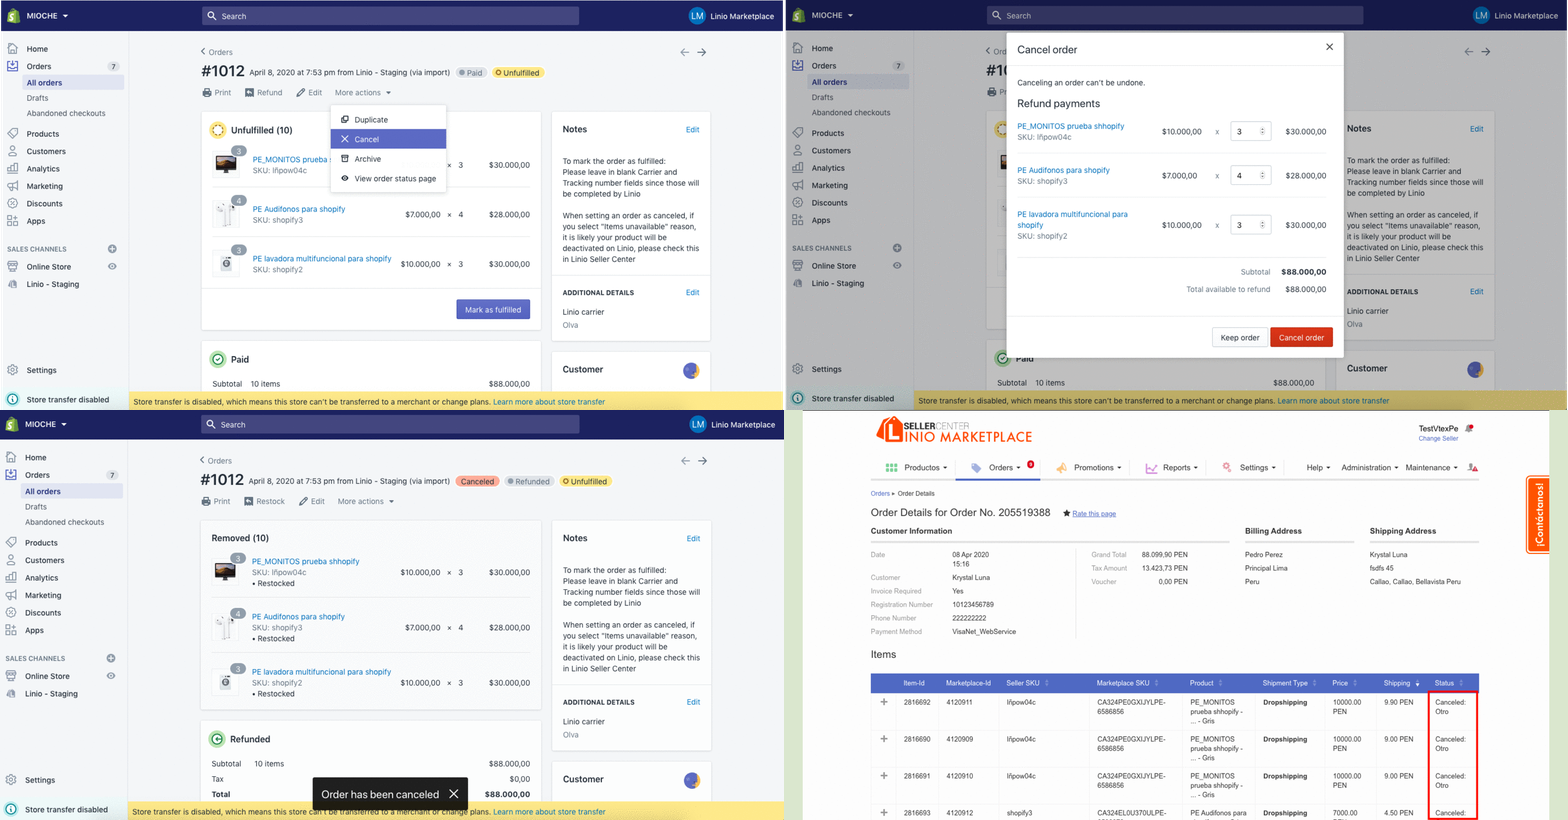
Cancel order
-
Select the order you want to cancel in the Shopify orders list, outside the app.
-
Click in more actions.
-
Select Cancel order.
-
Click on the Cancel Order button.
-
Fill the cancellation details with a description of the reason.
-
Click on the Save button.
Product deactivationWhen setting an order as canceled, it is likely your product will be deactivated on Seller Center. Please check this in Seller Center.
Order cancellation FAQsIn any case, you can see our order cancellation FAQs.
